Saffron Milk Pudding


Saffron Milk Pudding  is a milk based dessert made with milk and saffron.It is very tasty and easy to make dessert for any occasion.Here I made it eggless as using gelatine I do not like egg smell in my pudding.But if you are a vegetarian person,then you can use agar agar or chinagrass instead of gelatine 


Ingredients
------------
Milk-2 cups
1/2 cup granulated sugar
2 tablespoons custard powder
Gelatine-2 tablespoons
Hot water-4 tablespoons
2 teaspoons almond powder(grind 1/4 almonds in a mixer grinder at medium speed)
1 teaspoon rose water
1 drop kewra essence
1 teaspoon saffron

Method
_______

Add the gelatine sheets into a bowl,pour hot water and stir ,wait for few minutes until gelatin dissolved completely.

Take 1/4 cup milk into a bowl,add custard powder,whisk to make a smooth paste and make sure no lumps will form.

Heat rest of the milk into a saucepan by adding 1/2 cup of granulated sugar,1teaspoon saffron,2 teaspoons almonds powder.Stir and keep boiling until sugar dissolves completely.

Remove this saucepan from heat,and add custard powder,gelatine (before adding gelatine,stir it again with fork),rose water,kewra essence and stir continuously.

Again heat this mixture for 2minutes at medium flame,do not boil,just heat it.

Remove the mixture from heat and let  this mixture  be cool for 2 minutes.

Pour the mixture into each small invidiual bowl or a big bowl through a strainer, set them first at room temperature for atleast 1 hour,then refrigerate for minimum 2hours.

Before serving,take out the pudding from fridge,loosen the sides with a knife,invert upside down on a plate.

Tips

If you do not want to use gelatine then you  can use agar agar  or china grass (it is a vegeterian form of gelatin ).You have to go through the following  instructions  of using  agar agar or china grass instead of using gelatine .

5 tbsp  chopped agar-agar

Soak the agar agar or china grass in a 3/4 cup of cold water for 1 hour. Then heat on low flame until it dissolves and becomes a clear liquid.

When your custard  is about to ready then add melted china grass to the custard and mix.Boil again for 2 minutes. Strain the mixture into the mould and then follow  the upper  methods.


Want to know more Sweet Recipes,click Here

Want to know more Desserts Recipes,click Here


Hot Milk Muffin (Old Fashioned Vanilla Muffin)


The Hot Milk Muffin is nothing but  old fashioned vanilla muffin.It is very light and fluffy.It tastes so delicious. It is a velvety,moist muffin for any occasion like birthday,teaparty or any get-together.


One more thing I want to share with you that my blog has been nominated for Indian Blogger Awards,kindly click the right side bar top link and leave a message what you think about my blog.


-----------------------------------------------------
Author -Moumita
Preparation Time-10 Minutes
Baking Time-25-30 Minutes
Servings-8-10 Pieces

--------------------------------------------------------

Ingredients
-------------------
All purpose flour-1.5cup

Baking powder-1.5 teaspoon

Baking soda-1 pinch

Granulated /Castor Sugar- 1 cup

(If you use normal sugar,then just grind it at low speed one time to make it fine)

Eggs -2 

(Vegetarians people can use 1/3 cup beaten yogurt/ curd /100 gm condensed milk instead of using eggs )(if you are using  condensed milk then use 1/2 cup sugar as condensed milk is also sweet)

Milk-3/4 cup

Butter-1/4 cup

Vanilla Essence -2 tsp


Method
--------------

Preheat the oven to 180 degree C or 375 degree F. 

Grease muffin moulds with butter,if you use silicon Muffin mould or bake and serve Muffin liner then you do no need to grease it.


Take a bowl,  add  eggs or beaten yogurt or condensed milk and beat for 2 minutes or until thick.


Add sugar mix them very well until become a creamy texture.


Take another bowl,add flour, baking powder and baking soda and mix well.


Add the egg sugar mixture slowly into flour mixture,then fold with spatula until the dry and wet ingredients are well combined.


Addmilk and butter in a small saucepan.


Heat this mixture on low flame until the butter  has melted (make sure do not boil the milk butter mixture,just heat ).Add vanilla  essence  and mix.Mix well.


Gradually add this mixture to the cake batter.Fold with spatula slowly until just combined.Do not over mix.


Pour the batter into each muffin mould.


Bake for about 25- 30 minutes,(Baking times vary oven to oven,so please check after 25 minutes,  insert a toothpick of a muffin,if inserted toothpick comes out clean then your cake is ready.


___________
Tips
___________

If you bake in OTG,then always bake at TOAST  mode or make sure both the rods are on.

Place the cake pan in the middle rack.

If you bake in microwave,always bake at CONVECTION mode and use the lower grilling rack for baking.

Do not increase or decrease the temperature during baking.

Once baking is complete,then remove the pan from the oven as soon as possible.

Do not open the door of the oven while baking,otherwise moisture will get into the oven and it will harm your cake.

Want to more Cakes and Cookies Recipes,Please Click Here


Chicken Toastizza


Few days back,I went to the hospital for regular checkup,suddenly I got very hungry.
I was looking for a food shop nearby but could not see anything else except Cafe Coffee Day.
Then I decided to go to CCD to buy something to eat.There were so many items like sandwiches, toasts, pizzas, cakes kept in the showcase of the store,among all I liked chicken toastizza.It was very yuumy and tasty.Though I do not know the exact recipe of that item,but  after eating the food, I guessed how it was made.It is nothing but a pizza flavoured crispy chicken toast.So here I am presenting my guessing recipe☺☺of Chicken Toastizza.

-------------------------------------------------------------------
Author-Moumita
Preparation Time-10 Minutes
Cooking Time-15Minutes
Serves-4
Course-Snacks/Breakfast
Cuisine-World
-----------------------------------------------------------------

Ingredients

  • Bread Loaf-1(cut halved lengthwise,after that cut each half portion into two pieces)
  • Chicken Keema/Minced Chicken-2 cup 
  • Onion-1(chopped)
  • Capsicum-1(chopped)
  • Tomato-1(chopped)
  • Salt to taste
  • Pepper-1/2teaspoon
  • Oil-1tablespoon
  • Oregano-1teaspoon+1/2 teaspoon
  • Tomato Sauce-2teaspoons
  • Butter-2tablespoons.
  • Garlic-4 cloves (minced) 
  • Cheeseslices-4
  • Mayonnaise-4tablespoons


Method


  • Heat oil in a pan
  • Add chopped onion,fry until light brown
  • Add chopped capsicum,tomato,mix all the vegetables and stir
  • Add chicken keema,mix and stir
  • Add salt and pepper ,mix,continiously keep stirring
  • Cook on medium flame until the keema is cooked properly
  • Add tomato sauce, 1 teaspoon oregano and mix
  • Switch off the heat,keep aside the keema mixture from heat,let the mixture comes to room temperature
  • Add keema mixture into a bowl,then add mayonnaise and mix properly
  • Preheat the oven at 200 degree C
  • Heat garlic and butter in microwave for 1 minute
  • Spread this garlic butter on the top of each bread portion
  • Then add keema mayonnaise mixture on bread,spread with butter knief
  • Sprinkle red chili flakes,remaining oregano
  • Put a cheese slice on  each bread portion
  • Toast all bread in the oven till cheese bubbles and turn a light golden.
  • Remove from the oven 
  • Serve hot with tomato sauce.

Tips
If you do not have oven,you can also make it on gas stove.Heat a Tawa on low flame,add the chicken toast  on tawa,cover with lid,cook on low flame until cheese bubbles and turn light golden.

Want to know more Breakfast ecipes,click Here (Breakfast Recipes )

Want to know more Non-Vegetarian  Snacks Recipes,Click Here (Non Veg Snacks)

Want to know more Chicken Recipes,  Click Here (Chicken Recipes)


Fresh Cherry Cake


Few days back,I got a box of fresh cherries from the super market,immediately I decide that after returning home I would not have made anything else except cherry cake.
My family loves to eat any kind of fruit cake.A very common problem may arises when you make your cake batter adding a heavy fruit like cherry,the fruit tend to sink to the bottom of the pan during baking.To rectify this problem,instead of adding the cherries into cake batter,we have to mix it with flour.Mixing the cherries with flour helps stop them sinking to the bottom of the cake.And also before adding the cherries into flour,keep them  on a piece of paper towel to absorb the cherry juices.


________________________________________________
Author-Moumita
Preparation Time- 15 Minutes 
BakingTime-25 Minutes 
Servings -8 medium pieces

________________________________________________

INGREDIENTS 


All Purpose  flour or Maida-1Cup
Granuled Sugar - 3/4 Cup 
Milk (at room temperature ) - 1/2cup
Melted Butter or Vegetable-Oil1/2cup
Eggs-2 (if you want to avoid egg,use 3/4cup beaten thick Yougurt )
Baking Powder - 1 tsp
Baking Soda-1 pinch

Salt -1pinch
Vanilla Essence - 1tsp 
Fresh Chopped pitted cherries-1 cup(around 12 to 14 pieces)


METHOD 


Preheat oven to 350 degree  F or 180 degree C.for 10 minutes. 


Rinse,dry and pit all the cherries.Divide them into equal number or put them into two bowl in equal propertions.


Cut the first portion in half and keep them aside on a paper towel,these will be placed on the top of the cake.


Cut the remaining half in quarter and keep them aside on a paper towel, this will be folded with cake batter.


In a bowl,add all purpose flour, baking powder and first javed cut cherries ,mix them well.


Take another big bowl, add Sugar, Vegetable oil or melted butter, vanilla essence, eggs or beaten yogurt and milk,a nd fold them with a spatula,Do not mix so fast,slowly fold the flour mixture with liquid mixture until you get a smooth batter without lumps . 


Make a hole into the flour mixtures,pour the batter into the flour mixture slowly,mix them very well until the dry and wet ingredients are well combined


Lining 9 inch cake pan with grease proof paper Now Grease the paper with butter. Pour the  cake batter into the cake pan and fill the pans about 2/3 full. After putting mixture in the pan and smoothing the surface, hold the pan with two hands and  drop the tin three times to remove air bubbles.


Garnish the top surface of cake with the halved cut cherries.


Bake for 40 minutes  until a toothpick inserted comes out clean. Baking  times are vary from oven to oven,so keep checking.


Remove from oven,let it be cool. Turn the cake onto a plate,slice them and enjoy.


Want to know more Cakes n Cookies recipes,please click HERE


Tips

Adjust the quatites according to the cake size.

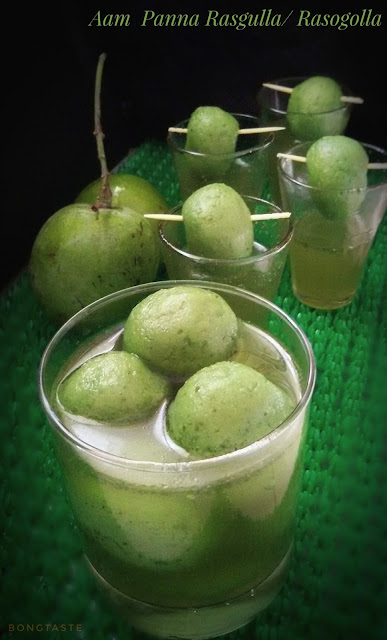
Aam Panna Rasgulla/Rasogolla(Indian cottage cheese ball soaked in green mango juice)


Rasgulla is one of the most popular sweet in West Bengal as well as in India.It is also a famous sweet in Bangladesh.As a Bengali,I love to eat Rasgulla and also make.In Bengali language,we call it Rosogolla.Though there can not be any comparison with the taste of traditional rasgulla or rasogolla,but sometime as a foodie I love to experiment with the flavour of rasgulla or rasogolla
.Earlier I made

Traditional Rasgulla/Rasogolla
Nolen Gur r Rasogolla/Gur Rasgulla
Chocolate Rasgulla/Rosogolla
Marble Rasogolla/Rasgulla made with both Chocolate and Vanilla Flavour
Aam Rosogolla/Mango Rasgulla

Last April I went to my father's house in Kolkata.One day my younger sister offered me a green colour rasgulla,suddenly seeing the colour I was amazed and asked her "what is this?" She replied it was Aam Panna  Rasgulla.Honestly speaking I had a little doubt about the taste,but when I took a bite of it,It was like heaven in my mouth.Then I thought I would have  to make it back home.Aam Panna is a very popular  drink to beat the heat of Indian summer .It is made using raw mango.This drink is slightly tangy and sweet to taste. Smililarly you will get both tangy and sweet taste while having Aam Panna Rasgulla or Rosogolla.


-------------------------------------------------------------------
Preparation Time-15 Minutes
Cooking Time-1 hour
Inactive Time-30 Minutes
Cuisine-Indian 
Course-Dessert
Servings-10/12 pieces
-------------------------------------------------------------------


Ingredients of Aam Panna
3 medium size green raw mangoes
2 cup water
4 teaspoons of sugar

Method of Making Aam Panna

Place the mangoes along with water in a sauce-pan and bring to a boil. Simmer the heat.Cook untik mangoes are well cooked.

Alternately you can pressure cook the mangoes with water till soft.

Let them cool and then peel the mangoes and get the pulp with the help of a spoon. Grind mango pulp along with 2 cups of water and sugar. Strain the mango juice into a bowl through a big strainer.Divide the aam panna into two equal sized glasses.As we make rasgulla using this aam panna so we do not mix salt and any spices here like normal aam panna .


How to make Chena or Paneer

Ingredients of making  Chena or Paneer or Cheese

1 litre  milk
1cup aam panna(unsalted and unsweetened)
1tsp Sooji or Rava or Semolina  (Optional )

Method of making Chena or Paneer

Take a heavy bottomed vessel, mix milk and 1 cup amm panna,mix it well.Make sure there is no lumps.

Bring it to  boil and keep stirring to avoid burning of milk..

Once the milk comes to boil, simmer the gas, start adding the 1cup aam panna and keep stirring, cook for few seconds until the milk solids gets separates from the whey. Switch off the heat.

Pour this curdled milk to the already lined muslin cloth over a strainer,squeeze out all the whey water (here do not rinse the milk solids/paneer under water, because we will keep the aroma of mango)..as much as possible.

Now hang the cloth covered  chena or paneer tap for 15 minutes. Then remove it from tap and place a heavy weight on chena for another 15 minutes. It will help to squeeze  more water from chena or paneer  or  cheese.

After 30 minutes, remove the cheesecloth from the chenna or paneer.

The chenna should not have too much moisture nor be too dry.

Add 1 tsp sooji or rava or semolina, adding sooji or semolina helps to bind the mixture.

 First mix the sooji with chenna and then begin to knead.

With the heels of your palms mash the chenna or paneer or cheese  and knead.

Keep on collecting the chenna or paneer  or cheese  from the sides and continue to mash and knead.

This kneading process is very important and it decides the texture of rasgullas .

Now take small portions from the chenna or paneer  and roll them between your palms to a smooth round ball.

Prepare all small balls this way.

Cover all the chenna or paneer  balls with a moist muslin or kitchen towel and keep aside.

How to make Sugar Syrup

Ingredients of making Sugar  Syrup

Sugar-2 cups
Water -4 cups
Aam panna-1 cup(remaining another cup )
Green  Food Colour-1pinch (optional)

Method of Making Sugar Syrup

in a large pan, take 2 cups sugar and 4 cups water. And 1 cup aam panna and bring it to boil.

You have to use a large pot or pan so that there is enough space for the rasgullas to cook and increase in size.

Mix and continue  stir the sugar syrup  until it will be dissolved,do this process on medium  flame.

Cooking  Rasgullas

When  the  sugar syrup will start to boiling,drop chena or paneer  or cheese  ball gently to the sugar syrup ...drop balls according  to the size of your pan,rasgullas need more space to be cooked...the size of the rasgullas  will be doubled  on cooking  on sugar syrup.

 Cover the vessel with  lid.,cook 20 minutes on medium flame.Open the lid and gently stir every 5 minutes to ensure  even cooking and  puffing.

Turn off the gas,transfer  the  rasgullas  into a serving bowl. You can enjoy this hot rasgullas  or refrigerate them and serve later.

Want to know more sweet recipes,click HERE


                         Pictorial Recipes


Cheesy Chicken Ala Kiev


Chicken Ala Kiev Recipe  is one of the popular appetisers of Russia,Ukraine and East Europe.Here tender juicy chicken breast is thinly sliced, flattened and then garlic herbed butter goes inside the chicken as a filling and these chicken rolls are then dipped  in a coating of flour, egg and breadcrumbs  and fried after a gooey filling added to it. 
It is the traditional way of making chicken ala kiev.The original chicken ala Kiev has a bone that sticks out like a handle(just for presentation).Here I added some mozzarella cheese with the herbed garlic butter fillings to make it more tastier and also did not cook with bone. This dish can be so appetizing snacks recipe  for your parties and get togethers.
------------------------------------------------------------
Preparation Time-10Minutes
Cooking Time -20 Minutes
Servings-2
Cuisine-World Recipes
Course-Appetizer/Starters
-------------------------------------------
Ingredients
--------------------

Chicken breasts
  • 1/2 cup Vegetable Oil , to fry
  • Whole Eggs
  • 1/2 cup All Purpose Flour (Maida)
  • 1 cup Bread crumbs
  • 1 cup Butter
  • 2 tablespoons Garlic , minced
  • 1 teaspoon Red Chilli flakes , (optional)
  • Salt , to taste
  • Black pepper powder , to taste
  • 1/4 cup Parsley leaves
  • 1 cup Mozzarella cheese , grated
Method

To begin making Cheesy Chicken Ala Kiev Recipe (Chicken With Garlic Cheese), in a mixing bowl, combine butter, chopped parsley, red chilli flakes (if using) and minced garlic. Mix well with a fork till the flavours are incorporated well into the butter

Then keep this bowl in the refrigerator for about 10 minutes or until a bit firm.

Cut each chicken breast into equally thin to about four pieces and then using a rolling pin roll them out to make them flat.

Sprinkle some salt and pepper over the chicken breasts.

Take out the butter from fridge, place about 2 tablespoons of butter mixture in the centre of each rolled out chicken breast. Also add about 2 tablespoons of grated mozzarella cheese on each chicken breast piece, roll each chicken breast tightly to seal the edges.

Keep them on a tray, cover with plate and refrigerate for about 10 minutes.

Once the refrigeration is done, coat the rolled chicken breast with flour. Dip in the bowl containing whisked eggs and then coat with breadcrumbs. Repeat the same process once more to get each chicken breast more crispy Chicken Kiev.

Take every Do the process with remaining chicken breasts. Cover the plate with aluminium foil or a plate and keep in the refrigerator for 20 -30 minutes.

Place oil in a non-stick frying pan to cover the base. Heat over medium heat.Add pinch of salt (when you deep fry something, add pinch of salt in oil, the recipe absorbs less oil is what is believed).

Heat oil in a pan and deep fry the chicken  pieces on low flame  till golden brown and crisp. Drain on absorbent paper/kitchen towel. Cook the remaining chicken breasts in the same way.

Serve Cheesy Chicken Ala Kiev with salad,
tomato ketchup and mayonnaise.

Want  to know more Chicken Recipes,please click Here

Want to know more Non Vegetarian Snacks Recipes,please click Here

Want to know more World Recipes,please clickHere